Quickbooks import guide
To import data from Quickbooks into Caseware Working Papers, download and install the Quickbooks Export Utility.
Quickbooks Utility download instructions
To download and install this component, follow these steps:
1. Close all other applications you have open except the web browser.
2. Click on the following download link here
3. Click Download.
4. When the browser asks what needs to happen with the file, select Save File.
5. Specify the directory for the file.
6. Run QBExportSetup.exe. The Caseware QuickBooks Export Utility will be installed to the following directory: C:\Program Files (x86)\CaseWare Quickbooks Export Utility\
7. Locate the CaseWare QuickBooks Export Utility shortcut created on your desktop and launch the utility.
Using the QB Export Utility
Note: Before exporting, launch QuickBooks and open the company file you want to export using the Admin account or the user account that has full access to the QuickBooks file.
On the QuickBooks Learning Centre Welcome screen, click Begin Using QuickBooks in the bottom right-hand corner.
If you fail to exit the Welcome screen, the QuickBooks Export Utility will not work.
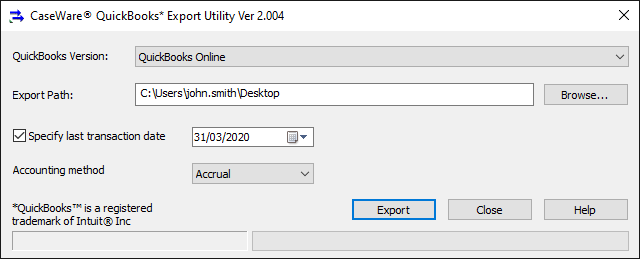
1. Select the QuickBooks version that is being used. Currently, 2008, 2009, 2010, 2011, 2012, 2013, 2014, 2015, 2016, 2017, 2018, 2019 & Quickbooks online are available.
2. Type the location of where to save the exported files or click Browse and locate the folder.
3. Click Export to start exporting. The exported files are saved in the specified location.
Note: Do not open any dialogs in QuickBooks while exporting. This action will block the data reading.
Example: If the company name is Mountain Sports Equipment, the following files will be generated in the export path:
Mountain Sports Equipment.cwq
Mountain Sports Equipment.account.txt
Mountain Sports Equipment.gl.txt
Mountain Sports Equipment.gle.txt
Mountain Sports Equipment.item.txt
Mountain Sports Equipment.class.txt
Mountain Sports Equipment.taxcode.txt
Mountain Sports Equipment.budget.txt
4. Copy all of these files or the entire export folder and forward them to the accountant. The exported files can then be imported into Caseware Working Papers.
Things to note when exporting
When the Export Utility connects to QuickBooks for the first time, QuickBooks displays the following dialog to gather certificate information: (for QuickBooks online please scroll to footnote)
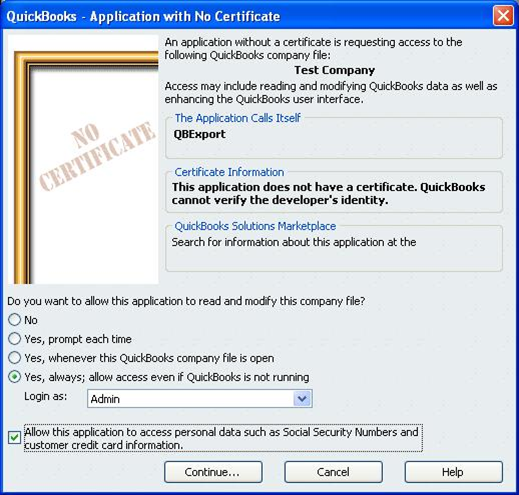
Select the options as shown in the screenshot above. Be sure to select the Allow this application to access option and log in as Admin or the user that has full access; otherwise, not all of the transaction data will be exported.
Click Continue.
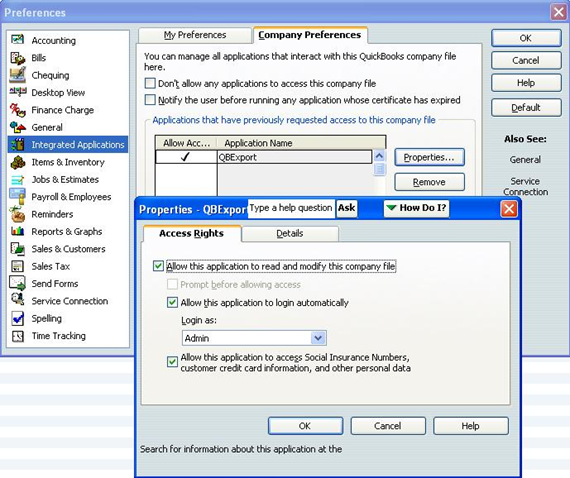
If the wrong option is selected and access is denied, go to QuickBooks Preferences and change the properties for Company Preferences in Integrated Applications to grant access right to the application QBExport.
If the QuickBooks file is large, it may take a long time to export. Please refer to the following table for approximate times:
|
File Size |
Export Time |
|
45MB |
15 minutes |
|
120MB |
40 minutes |
|
200MB |
70 minutes |
*Testing machine: CPU 2.33G
The QuickBooks setting for the Report might affect the export and import. If the values of some accounts are not imported correctly, go to QuickBooks menu Edit, Preference, Report&Graph and Company Preference Tab, select Name only and export again.
If the utility takes an extremely long time to export, check whether the duplicate account names exist in the QuickBooks file. If true, setting up the account number for those accounts with same name will accelerate the export.
Importing Files into Caseware Working Papers:
1. Ensure that a supported version of Caseware Working Papers is installed on the computer. Open Working Papers.
2. In the File menu, select Import, then Accounting Software.
3. In the Import From drop-down menu, select QuickBooks followed by the correct Quickbooks Version.
4. Browse to the .cwq file that was created using the Export Utility previously.
5. Once selected, the file name should appear in the Select Client IDFile field.
6. Select the relevant options (press F1 on your keyboard to access the help menu to see what each one means).
7. Click OK to start the import process.
- Related template: None
- Software platform: Working Papers 2022, Working Papers 2023